Fresh OpenOffice Templates

I was recently installing Ubuntu on an old Dell for a friend. I don’t try to push Linux on people, but if they want something cheap on an old machine I just tell them what a new version of Windows costs. At that point they either go buy a new machine instead or ask me more about Linux.

Once we get to that point I ask a them a few questions about how they use their personal computer. This recent situation called for compact disc booklet templates and a greeting card making application. In order to avoid complexity I rarely tell non-designers/tech geeks to give Inkscape, Scribus or the GIMP a try. What this means is finding some specialized application that makes the desired task super simple. If that isn’t available I turn to OpenOffice.

OpenOffice is surprisingly versatile and effective at the same time. There are also hidden benefits to using it, like dynamically generating letters for a small company with the power of OO’s mail merge tools or using embedded spreadsheets to create tables of data within a layout. Cool stuff that the professional-focused graphics tools leave to more specialized programs.

The end result, anyway, is that I decided to create some templates for OpenOffice. The related templates that the usual search engines pointed me to were not very good, so I thought providing these as free downloads might be helpful to some folks out there. What I have is a CD Booklet and Tray template and a Greeting Card template for OpenOffice Draw. Enjoy.

  1. Compact Disc Booklet + Tray template
  2. Greeting Card template

Designing Around WordPress

If you haven’t noticed, I’m doing something really stupid: I’m learning about WordPress Templates by way of making changes to my live site. It’s interesting how they built the Kubrick template. It’s probably very brilliant in its way of dealing with qualities of CSS. However, as an example to learn from, it has a lot of idiosyncrasies.

So far, I feel like this isn’t a bad night’s work in adapting an existing style from a ground-up site to a WordPress template. I hope the site remains to be usable during this transition period.

Subversion Commands

This glossary of Subversion commands is a work in progress.

My primary interest in creating this is to help people like me, that are not formally educated in programming. The abstract concept of version control is not difficult to understand or appreciate, but I have found that learning to use version control applications like Subversion or GIT without guidance is difficult.

You DO have to be familiar with command line basics. Remind me to write a glossary for the command line similar to this one. 😀

Don’t forget the excellent Subversion book that is FREE: Version Control with Subversion. There is also the very useful act of typing svn help into the terminal.

Create a Repository
svnadmin create /home/jason/mySVNrepo
Create an SVN repository named “mySVNrepo” in my user directory.
Adding a New Project (Set of Files) to Your Repository
svn import /home/jason/genweb [one space] file:///home/jason/mySVNrepo -m "initial import"
Add/Import the directory “genweb” to the “mySVNrepo” repository with the log message (-m) of “initial import”
Log Message
A Log Message is a description of the changes associated with a particular action. A log message can be
A brief statement: -m "initial import"
An entire text file: -F MyLogMessage.txt
Or enter directly from VIM: -m vim
Check Out a Copy from the Repository
svn checkout file:///home/jason/mySVNrepo [one space] /home/jason/MyWorkingCopy

\

You cannot work directly on the files saved in the repository. To make changes you must first Check Out a copy (like a Public Library) of the files in the repository. The checked out copy will be saved in the directory “MyWorkingCopy”
Command Line Basics
Before you go any further it is important that you understand how to use the command line.

  • The Command Line Interface (C.L.I.) is a way of interfacing with a computer operating system by way of commands that are expressed with lines of text. This is in contrast with the much more common Graphical User Interface (G.U.I.), a way of interfacing with a computer operating system by way of commands that are expressed with graphical menu selections or the movement of the mouse.
  • The CLI generally operates in a certain context: a file directory (or “folder” for those of you coming in from a GUI 😀 ). In the world of *NIX the most common CLI is called the “Bash Terminal”. In this terminal the context is stated before the flashing cursor: jason@NEWHOTNESS:?$ This means that the user is jason, the machine is NEWHOTNESS and the ? is shorthand for the active user’s home directory.
  • You can change the directory in which you are working with the change directory command. For example:
    cd ?/Desktop will move the CLI context to my desktop directory and indicate that it has done so like this: jason@NEWHOTNESS:?/Desktop$
  • Similar to HTML, the CLI can refer to files in two ways: absolute locations and relative locations. The change directory command allows you to move to the directory where the files you wish to act on are located. This saves you the trouble of typing out the entire absolute file path every time you execute a command.
  • To accomplish the following, it is necessary to change to the directory of your working copy. Some of these Subversion commands need context.
Check Status
svn status
Will retreive feedback on the status of your working copy files in relationship to those in the repository.
Status/Attribute Shorthand
  • A = Added
  • C = Conflicted
  • D = Deleted
  • I = Ignored
  • M = Modified
  • U = Update
  • R = Replaced
  • X = item is unversioned
  • ? = item is not under version control
  • ! = item is missing
  • ? = versioned item obstructed
Subversion uses letters to represent the relationship of your files to those in the repository. The ones that say a file is “unversioned” or not under version control illustrate that the actions of adding, moving or deleting files in the repository must be accomplished with the SVN application rather than your operating system’s file browser.
Update to Match Repository
svn update
Update your source to match the latest version in the repository, notifying you of every updated/added/deleted file as well as updates that may conflict with your own changes to the source.
Resolve Resulting Conflicts from Update
svn resolved '~/DevFolder/sourceFile.py'
After you have resolved the conflicts identified by Subversion, you have to tell it that you have done so.
Create Patch File
svn diff >> PatchName.patch
If you are not on the developer list for a project, you will most likely not be able to commit your changes directly to the repository. In this situation you can email or post a ‘patch’ file. The patch file is a very concise text file containing a description of the changes you have made, what file they are in and where in that file they can be found.

Nine Inch Nails: OSX Ghosts

If you haven’t heard, Nine Inch Nails has a new instrumental album out that is being sold directly by the artist via the web:

http://ghosts.nin.com

I gladly downloaded the free sample tracks to check it out. I’m not quite sure if I’ll purchase more or not. The true test is how entertaining the songs are while I’m sitting still on the interstate trying to get home from work in downtown Nashville.

It’s no secret that Mr. Reznor works on a Mac. I think in one of the boxed sets he’s even distributing the album songs in the GarageBand.app format to make it easy to create remixes. No offense, but I’d be more impressed if he offered them in Audacity format. Him distributing gBand files like that… well he might as well be on Apple’s payroll.

But let’s not be ungrateful bastards. He’s certainly one of the few popular artists today that understands how giving some of his source files away under a Creative Commons License is an excellent way to promote his cult of personality. Hats off.

With that said, finding a folder named ‘_MACOSX’ in the free download ZIP archive is still amusing. I wonder, does the Finder window look really cool when you open this free MP3 folder? Or is this just the side effect of how carefully they prep a ZIP archive for mass distribution? “Oh hey, let’s get that on the site tonight”.

[ right-click/Create Archive]

NIN Ghosts in OSX

GRAMPS 3.0 Coming Soon!

I am dabbling in software development with the GRAMPS (Genealogical Research and Analysis Management Programming System) project. It is a genealogical database building program that is available for Linux.

I got involved with the developer group after struggling to make my genealogy site look great. The markup techniques were outdated or wrong and nothing had an ‘id’ or ‘class’. After recommending the change to the devs, they let me know that it wasn’t a top priority and recommended that if I wanted to improve the output, I would have to do it myself. This would involve working with Python and also looking stupid asking dumb questions about version control and compiling GRAMPS myself to check my work. With a little time and patience (as well as being unemployed for three months in Nashville with just my wife for company) I put myself to the task.

I have been updating the ‘Narrative Web’ plugin, written in Python, that exports your genealogical data into a web site. Mostly I just corrected and updated the XHTML markup that was present amidst the Python. I did hack up the code a little so that the navigation could be styled to indicate the active page or section.

My primary focus was to make the sites more accessible to CSS. In the process I created a few style themes to be distributed with the application. I am quite proud of them and excited to hear feedback from the user community once GRAMPS 3.0 is released. Following is a few screen shots of the site output as it was and the four primary styles that I developed so far.

GRAMPS 2.2 Narrative Web Plugin Output

‘Modern’

GRAMPS 2.2 Modern Style

‘Tranquil’

GRAMPS 2.2 Tranquil Style

GRAMPS 3.0 Narrative Web Plugin Output

‘Basic – Ash’

Basic comes in a variety of color schemes and is based on the original ‘Modern’ style. I hate using the word ‘modern’ outside of discussions of philosophy or fine art. The general public in the U.S. is convinced that it means ‘contemporary’. No doubt this is thanks to decades of marketing professionals trying to make their products sound impressive.

GRAMPS 3.0 Basic Style

‘Nebraska’

I named this after my home state. It was my original stylesheet for the new markup. For that reason a lot of id and class solutions in the markup came out of challenges created by this design. I wanted this design to look fresh and inviting while being very easy to read.

GRAMPS 3.0 Nebraska Style

‘Mainz’

Named so for Gutenberg’s birthplace, this design was created to show off the potential of the new markup. It’s a bit repetitious of me, but for some reason the vision of the website as a sheet of paper is very appealing. I started this one based on the name of one of the original GRAMPS styles: Certificate. The original style didn’t really look like a certificate, but this one does.

GRAMPS 3.0 Mainz Style

Default Print Style

This is probably the style that will be the most overlooked. With XHTML + CSS there is the potential for the browser to automatically switch stylesheets based on the media of representation. You can define one stylesheet as ‘screen’ and another as ‘print’ (there’s actually quite few different defined mediums according to the W3C, including ‘mobile’ and ‘projection’). GRAMPS is the first project where I could form a strong argument for using this feature to its full potential. Now anytime someone prints a page from a Narrative Web site, the output will be well designed for print with an emphasis on efficiency and legibility.

GRAMPS 3.0 Default Print Style

There’s still more work to do, but I wanted to get the word out on this great update to GRAMPS that’s just around the corner. Along with my relatively minor contributions, the other developers have been working very hard to make 3.0 an impressive and powerful update. If you are interested in trying it out, do keep in mind that in the open source world ‘.0’ means ‘submit final work to users and fix a lot of reported bugs’. So, if you are looking for a perfect application, I recommend waiting for GRAMPS 3.1. 😉

Dell XPS 420 with Linux Review

Dell XPS 420Well, it’s not perfect. I think my big mistake was not going with the more expensive NVIDIA video card. Actually, I’m fairly certain that any problems I am having have everything to do with the video card: ATI Radeon HD 2400. On the whole it’s exactly as advertised. Following are some things that I feel are important features.

Packaging

I was disappointed that the box for this beast was so big. I’ve seen the recent Mac Pro tower boxes and they are not much bigger than the machine itself. The XPS 420 box is HUGE. This does mean that the machine arrived in pristine condition though.

Dell is definitely close to Apple in presentation with the XPS systems. Here’s what came with the machine:

  • 1″ thick User Manual
  • Small quick start manual
  • Very nice noise-canceling ear bud headphones
  • Velcro straps to help you keep your many wires and cables under control
  • Dust Towel for the everyday necessity of wiping the dust off the glossy black finish
  • Faux-leather XPS-stuff collection book-ish thing to hold this stuff
  • Dell Multi-media keyboard (extra $25 I think) It’s very nice
  • Dell 2-button mouse with scroll (I am using my trusty Logitech MX310 instead)
  • REAL WINDOWS VISTA INSTALL DISC (not a stupid ‘from recovery partition disc’)
  • ATI Driver disc, basic Dell software disc, Adobe Photoshop and Studio Elements, Microsoft Works

I also bought a $50 speaker set from them with these nice, small speaker panels to put on your desk and a 12″ box sub-woofer to put on the floor. Sounds great, but would rather just have the table speakers alone.

Fit and Finish

The XPS 420 seems well built and solid. Surprisingly, it’s just about as big as my G5. However, it weighs no where near as much. Also, this thing runs very quiet. Now I realize how loud the G5 was. I think I remember them advertising the G5 as a quiet machine, but maybe I’m crazy.

Dell XPS 420 tower tray
There’s a nifty rubber-bottomed tray on top of the tower that is an excellent fit for all of those gadgets that usually end up on top of your tower: Portable Media Player, Digital Camera, and I put my wireless router there as well. They also provide some thin slits to hide you USB cables that run from the devices to the much-appreciated SIX USB PORTS on the back of the XPS. I don’t think Apple would ever do this, but I love it.

Dell Multimedia Keyboard
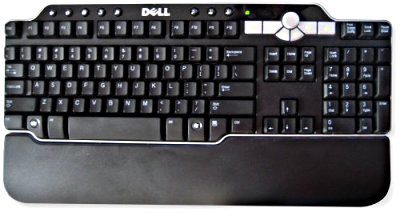
The Dell keyboard feels good and the multimedia keyboard comes with an attachable palm rest. I highly recommend spending a little extra for this keyboard. The multimedia keys all work in Linux except for the ‘Volume Dial’ which apparently does not have a ‘button push’ input. If you Google it, somebody has written a script to handle the input, but I just remapped the big arrow keys on the left to control the main system volume instead. It’s nice to have keys specific for media player (next track, previous track, play/pause). There are a few additional buttons that can be used for pretty much anything. I was able to set the ‘Close Window’ button to ‘Eject’ the optical drive disc. My wife likes the Calculator button. Also, someone other than Apple has finally caught on to the idea of putting USB ports on the keyboard. That’s excellent.

GNU/Linux Experience

Thanks to the video card, installing Ubuntu wasn’t very slick. Eventually I used the Alternate install disc with the text-based installer and was sure to specify only my optimal screen resolution, a few smaller resolutions and nothing larger than what I planned to use. Once I figured that out everything went fine after installing Envy and getting the direct ATI video driver.

Everything works aside from things related to the video card. What doesn’t work?

  • Fast User Switching: I get a black screen and Ctrl+Alt+Backspace doesn’t help
  • Hibernate and Sleep: Appears to go to sleep fine, but won’t wake up
  • Compiz Fusion with dual-display: It does work, but doesn’t feel stable and playing video suffers with it on

The only thing I use Compiz Fusion for is the Exposé-like window picker and I think the Alt-Tab app switcher in Compiz looks nicer and is larger. So, not a huge loss and I’m confident these issues can be resolved with improved driver offerings from ATI. Fast User Switching would have been nice also.

The ATI Catalyst Controller application for setting up the video card works well enough. Setting up a second monitor with a combined desktop space was simple. It’s seems a little out of wack though. I wouldn’t fiddle with it too much.

Performance

My system sports the Intel Core 2 Quad 2.4 GHz processor with 3 GB of RAM. This machine is fast fast fast. I’m pretty sure most of the speed comes from just one instance of the 2.4 GHz processors. The Quad proc does flex it’s muscles when exporting/converting/compressing video and audio. I don’t have numbers for you, but I was exporting some MP3 files from audio recordings I had made a while back with impressive results. I started the process on my 1.6 GHz 1 MB RAM G5 just to compare. The MP3 compression was at least twice as fast using the latest version of Audacity on both machines. And if you watch the processor activity graphs, the old G5 was peaking the whole time while the Core 2 Quad just hummed along on two of it’s four cores.

Running virtual machines with it is an excellent experience. As mentioned earlier, my wife likes to watch ABC shows online. I tried the Firefox-for-Windows-Over-Wine trick, but that’s not working right. Instead I set my wife up with a Windows XP VM using VirtualBox. I know VMWare is king in virtualization, but installing VMWare server, after agreeing to the legal mumbo-jumbo is a pain and apparently I can’t install VMWare Player via Synaptic on my system (I don’t get it). VirtualBox, because they offer a full open source version, is much easier to install. The performance is good too. I hear the big difference is in networking and that’s not really why I need a virtual server anyway. Regardless, my wife can enjoy a full-screen ABC.com HD video experience on my Linux system via Windows XP via VirtualBox. Fantastic!

Windows Vista

For starters, Windows Vista runs just fine on a VirtualBox VM with plenty of allotted RAM. However, now that I’ve had some time to look around, I find Vista to be very cluttered. The main menu has too much stuff displayed immediately and there’s so much crap on the initial desktop including the widgets that I felt claustrophobic. I can only imagine what a less savvy user would think on initial start. I’m confused. I thought they were trying to minimize menus and everything to focus on the average user with the capability to customize for an advanced user. They’re so inconsistent. Windows XP was actually looking good in my opinion. As a Mac user I felt a little threatened at the time. I think Vista may be a step back.

On the other hand, the install experience was a big improvement, but unfortunately most of their users won’t ever experience it. The loading and log in screens look great too. I’m starting to wonder if I should start fiddling with the Linux Gnome log in screen. Somebody, a designer, needs to step in and make it cool like what Windows Vista and Mac OSX offer. Currently the standard ‘enter username and password’ screens can look nice, but the ‘list of users with avatars’ screens look like crap on a stick.

Login Ubuntu Login CleanX
Login OSX Login Windows Vista
Login Linux Gnome User List

Complaints

  1. I can only wait for ATI to improve their Linux driver. Supposedly more ‘openness’ is coming down the pipe. Worst case scenario: I’ll buy another video card. However, it seems like the best open source video support goes to Intel’s integrated video hardware. Since ATI is owned by AMD and NVIDIA is owned by Intel I’m pretty sure Intel is sharing info about the integrated video because it’s their low-end hardware. Somebody tell me what a good 3D and dual-head capable video card is for Linux. It all looks bad outside of older hardware that has been reverse engineered.
  2. The black gloss looks great in photos but is a bitch to keep clean in the real world. Anybody that’s owned a black car knows that.
  3. Frickin’ Windows Sideshow display is completely worthless, even if I was running Windows.
  4. Too many wires and cables. I definitely appreciate why people pay a lot for an iMac.

Dell XPS 420 Lots of Wires

Overall

I’m very pleased with this system. It’s extremely nice and it’s a pleasure to finally use a high-powered machine with plenty of screen real estate to run my favorite open source graphics programs. I apologize for the long review (took WAY too long to finish) but there were a lot of relevant details. I hope this review is helpful for Linux users looking for new hardware especially.


Photoshop CS in Linux

Being a freelance Web Designer & Developer is a good career if you are trying to work full time on Linux and open source software. However, you still have to be compatible with your clients’ source files and backups. This means using Photoshop to build layouts or at least slice up the layouts that you get in PSD file formats.

I have been using my aging G5 (boy, saying that makes me and my checkbook cry) to deal with Photoshop files. However, since I have been setting up this beast of a Dell for the Ultimate Linux Desktop I spent some time today in getting the Windows version of Photoshop CS running on top of Wine, the Windows Compatibility Layer.

Wine is so good right now that you can simply throw the Photoshop install disk in your Linux box and run the installer. I’m not kidding, but keep in mind that this is Photoshop CS, not the latest and greatest Photoshop CS3. Wine’s site has a great deal of information about a variety of Photoshop versions running on Wine.

How did I do it specifically? I installed Wine, the Microsoft TrueType Core Fonts Ubuntu: sudo apt-get install msttcorefonts, customized the Wine interface to taste via Applications/Wine/Configure Wine and then ran the Photoshop CS installer.

Hold On, Save For Web Isn’t Working!

Alright, so there is one big fat catch that, if not dealt with, pretty much makes Photoshop worthless to web professionals: The amazing Save For Web plugin doesn’t work. Damn. So close.

Solution: The Magic of Windows Back Slashes

Yeah, it can be fixed! So, the secret is in how you start Photoshop. Either you or Wine setup some kind of shortcut unless you are starting Photoshop from the command line. Here’s how my original shortcut command was written:
env WINEPREFIX="/home/jason/.wine" wine "C:/Program Files/Adobe/Photoshop CS/Photoshop.exe"

and to fix the Save For Web problem, simply replace the forward slashes that follow C: with back slashes:

env WINEPREFIX="/home/jason/.wine" wine "C:\Program Files\Adobe\Photoshop CS\Photoshop.exe"

Huh? What?

Don’t ask. I can only guess that how that particular plugin was written included Windows-directory style references within the code. Sincerely, I have no clue. Thankfully the Wine developers figured it out. On that page it mentions Photoshop 7 specifically, but CS works the same way.

Kodak C330: Apparent SD Card Size Limitation

Kodak C330

Yes, this camera is over two years old. However, we’ve been wanting to replace my wife’s 256 MB SD Card for some time now. With much appreciation, we received a shiny new Kodak-brand 2 GB SD Card for Christmas from her parents. Excellent.

I finally got around to trying it out today only to discover that the C330 camera reads the card as ‘Full’ and any attempt to format the SD Card (which I know to be completely empty) results in the statement ‘Filesys Error 0e0010’.

Fortunately I have another SD Card-based digital camera. It sees that the card is empty and says I can take 600+ pictures at some ridiculously high resolution. I even tried swapping my other camera’s 2 GB SD card with the new one with the same result.

My conclusion is that it’s the size of the card at fault. The 32 MB and 256 MB cards we have work just fine with the C330 while the two different 2 GB cards both have the same problem with this camera. This isn’t surprising coming from a fairly inexpensive camera, but still disappointing knowing that her parents could have spent a lot less money for a card that we could use.

My last gripe is that this apparent limitation isn’t listed in the specifications for the camera in the user manual or on the Kodak site. Perhaps the primary audience for this device is the type that just uses the card it comes with? Perhaps Kodak never imagined SD Cards getting so big! 😉

X11: Switch Control Key To Apple/Command Key

One of the major problems with using X11 to run *NIX applications on OSX is switching from using the Apple/Command/⌘ key to using the Control key as your primary modifier key.

First of all, I don’t understand why the Control key is where it is on keyboards for OS’s that use it as the primary modifier key. It is probably the least ergonomic key to use (unless you have the good fortune of using a Thinkpad, since they don’t include the Windows key). Apple, for all its missteps, gets it right by making the primary modifier key easy to press in combination with other keys. Command, Control, Apple, ⌘, whatever you call it, put it in a comfortable spot! That one detail almost prevented me from switching to something other than OSX. Seriously.

With that said, it’s no surprise that Apple puts the rarely-used-in-OSX Control key off to the far corners of the keyboard. As to why Apple doesn’t include an option to switch the Control/Command keys in the X11 preferences, I can only imagine.

Second, making this change isn’t for *NIX purists that like it the way it is. Don’t get pissed at me. I’m just trying to help Mac people enjoy the fruits of the Open Source community because I’m frustrated with Microsoft and Adobe (and even Apple). Their customers take a back seat to their interest in making money.

Let’s Get Started!

This is simple and if anything goes wrong, it’s easy to get back to where you started. Here’s the meat and potatoes:

  1. Start the X11 application
  2. In X11 go to X11 > Preferences > Input tab. Make sure that the following options are UNCHECKED:
    • Follow system keyboard layout
    • Enable key equivalents under X11
  3. Close X11 Preferences.
  4. Open the Terminal.app (Applications > Utilities > Terminal.app)
  5. Type the following in the Terminal window:
    vi ~/.Xmodmap and press Enter. This will open a file named ‘.Xmodmap’ located in your home folder ‘~/’ with the text editor program called Vi. Don’t be frightened!
  6. Vi is run from within the Terminal, so it won’t look much different. Press ‘a’ to switch to Vi’s Insert Mode (I think the ‘a’ stands for ‘Append’) and then type in or copy/paste the following text:
    ! ~/.Xmodmap
    clear Mod2
    clear control
    keycode 63 = Control_L
    keycode 67 = Control_L
    add control = Control_L
  7. If you have a MacBook and want to use both the left and right ⌘ keys, use this version instead:
    ! ~/.Xmodmap
    clear Mod2
    clear control
    keycode 63 = Control_L
    keycode 67 = Control_L
    keycode 71 = Control_L
    add control = Control_L
  8. Now press ‘esc’ or the Escape key to exit the Insert Mode and return to the Command Mode.
  9. Type :wq and press Enter. This command tells Vi to Write (think ‘Save’) the changes you made to the file and Quit Vi itself.
  10. Type xmodmap ~/.Xmodmap and press Enter to complete this process.
  11. Quit Terminal.app
  12. Open something in Gimpshop, Gimp, OpenOffice, Inkscape or any X11 application that you use to test if you have successfully switched to the Apple/Command key.

If you suddenly cannot get any of your X11 applications to start, you can delete the .Xmodmap text file from your home directory. To do this, open a Terminal in either the X11/terminal or the OSX Terminal.app: rm ~/.Xmodmap and press Enter. The command rm stands for ‘Remove’. Be careful with this command. There is no ‘undo’ in the command line.

This post uses information found at //extrabright blog and The University of Illinois at Chicago’s Unix 101 pages on Vi. This is my attempt to write a more concise how-to.

New Dell XPS 420: Linux Dream Machine?

One week before Christmas my beloved Thinkpad T42 started having motherboard problems. After a little looking around I found that the problem was common. I don’t know what the deal is exactly, but pressing on the keyboard or touchpad too hard causes the display to flicker and the system to freeze. As a bonus it will also freeze at completely random moments. No more reconditioned laptops for this kid.

So I just finished ordering my first Dell desktop. I have been looking around at the Circuit City, Gateway, NewEgg and System 76 sites. They all have great Core 2 Duo-based systems at good prices. I applaud what System 76 is doing selling Ubuntu pre-installed systems only. Unfortunately it looks like they can’t compete with the buying power of the much larger discount computer manufacturers. I can’t deny my financial situation. The price difference is just too great. I even looked at building my own machine with pieces from NewEgg, but after talking to a friend I swallowed my former-Apple-promoting pride and gave Dell a try.

First I looked at the Ubuntu Pre-installed systems that Dell offers. Much to my disappointment the offering is very limited and not high-powered. To me, I would think that Linux users are generally advanced computer users that buy fairly high-end systems. I’m sure they did a lot of market research to determine what systems to offer, but this looks like a misstep to me. Perhaps their target isn’t people that know how to install Linux on any machine. Perhaps their target audience are people looking for an inexpensive alternative to Windows. However, if that indeed is the goal why aren’t they selling the Linux systems along side the Windows systems?

I decided to just shop at the regular Dell store and install Ubuntu myself. From what I’ve read, there are Linux drivers for most of the hardware provided, albeit ‘restricted’ drivers provided by the manufacturer. I don’t have a problem with installing these drivers. I’m grateful that the manufacturers even bother to provide them. Also, the companies will respond to increased demand for their product. They won’t necessarily respond to an extremely small group of people bitching about their drivers being open source. That’s how I look at it.

I settled on the XPS 420 because of its price range and power. Here are my new machine’s specs:

  • Intel® Core 2 Q6600 Quad-Core (8MB L2 cache, 2.4GHz, 1066FSB)
  • 128MB ATI Radeon HD 2400 PRO
  • 3GB Dual Channel DDR2 SDRAM at 667MHz – 4 DIMMs
  • 320GB – 7200RPM, SATA 3.0Gb/s, 16MB Cache
  • CD/DVD Burning Optical Drive
  • External speakers with sub-woofer
  • FINAL PRICE: $974 (after $100 savings, before tax/shipping)

The video card is supposed to be capable of outputting to two displays. However, I am prepared to buy a second video card later if that doesn’t work under Linux. I know that my Apple G5’s video card doesn’t successfully accomplish dual-display under Linux even though it works fine under OSX. Maybe xrandr is more capable with this particular video card. I am very impressed with the potential of xrandr, especially after my S-Video Out setup from a few weeks ago.

I’m expecting this machine to be everything I could ask for in my own personal design/development system. It should be delivered before the end of the week, but with the New Years holiday it might be next week before I can get back to working in Linux. I will report on the outcome asap.

Homework assignment:
If anyone can explain exactly how many ‘cores’ are in the above listed processor, I’d love to know. Due to the 4-DIMM ram setup I am guessing the magic number is four. However, the title ‘Core 2 Quad Core’ is confusing. If a Core Duo has two cores, a Core 2 Duo has four cores, then a Core 2 Quad Core should have eight cores, right?

HTML Character Reference Chart Update

I have just finished updating my HTML Character Reference Chart. Along with updating invalid numerical references 129 through 159 to the valid decimal numbers there are a few new features:

  • different character sets in separate views
  • complete decimal and hexadecimal references
  • entity references for some characters.
  • New Complete Table Section displays all references
  • New Favorites Section displays only your favorites

HTMLChar1

This new version is built with XML and XSLT, making the process of updating information or creating new layouts very simple. I am learning the basics of both right now and it’s amazing how powerful and elegant these simple text files can be.

The Favorites section works with comma-separated URL values. You will have to edit your URL “manually” by adding the decimal, hexadecimal or alphabetical values to the end of the page’s URL. There is an example favorites set to help you get started.

BohemianAlps HTML Character Codes »

Watching Internet TV on My TV

Recently, due to our move and lack of willing to pay for a DVR with our cable subscription, my wife has introduced me to how the big networks are offering all their shows online. It’s great. Really.

Unfortunately, this means my wife has been sitting in our bedroom watching her favorite shows on a 19″ computer monitor hooked up to our Apple G5.

Solution: I found an RF modulator at Wal-Mart for $20 (RCA I think) that lets me hook my laptop’s S-Video output up to our old 30″ CRT. I wouldn’t write any letters on it or do lengthy reading, but video and images look pretty good. Using Linux certainly threw a few curve balls into an otherwise simple setup.

So, how can I too enjoy Internet TV on my old CRT Television?

Well, you are in luck, ‘cuz I did all the hunting around for you. At least if you are running Ubuntu Linux 7.10 on a Thinkpad T42.

Here’s how to use the xrandr tools to start your S-Video out:
mfbernardes.com: Finally I Got S-Video Working My Thinkpad T42
XStrikeForce: HowToRandR

I took Mr Bernardes’ terminal commands and created custom application shortcuts for each separate step that I use frequently:

  1. Activate S-Video
    xrandr --output S-video --set load_detection 1
  2. Start S-Video OUT
    xrandr --output S-video --auto
  3. Turn LCD OFF
    xrandr --output LVDS --off
  4. Turn LCD ON
    xrandr --output LVDS --auto

Then simply go to NBC.com, CBS.com or whatever. Hell, YouTube even.

Another good thing that helps position your video window on the TV for optimal viewing is the ZOOM capabilities of Compiz-Fusion. So look into that. You can get it set just right without too much visual noise around the video.

Wait a second, all my favorite shows are on ABC…

If you haven’t figured it out yet, ABC has a custom video player that is not available for Linux. That’s a deal breaker right there. Especially since that’s my wife’s favorite channel currently.

Luckily, the good folks over at WINE are doing a smash-up job. The trick is to install the Windows version of Firefox over WINE and then watch ABC from Firefox/Windows. Check out the following info for details:

JDESLIPPE

It’s a pretty clever solution. Not too many details there.

What about audio?

The RF Modulator that I bought has inputs for component audio that will then pass to your TV via COAX. I actually have a receiver stereo, so I push the audio through that from my laptop for the full experience.

That was simple!

I don’t guarantee this will work, but I wish you luck if you choose this challenge.

IEs4Linux Also for OSX on Intel

I have been using the IEs4Linux system for a while now to assist in developing websites. It allows you to install various versions of Internet Explorer in Linux. It’s great for testing websites against the many bugs in IE as you develop them.

Recently they have developed a version for OSX on Intel machines.

http://www.tatanka.com.br/ies4linux/news/49

You have to install Darwine and X11 on OSX to use it, but after that it seems pretty easy. I am not so fortunate as to own an Intel-based Mac, so I can’t test it for you.

Wine info
http://wiki.winehq.org

Darwine info
http://darwine.sourceforge.net/download.php

Wine on OSX info
http://wiki.winehq.org/MacOSX

Create and Manage Professional Letters with OpenOffice and PDFTK

I have slowly been learning the ropes of professional presentation for my freelance work. Design school taught me a thing or two about designing letterhead and the importance of looking professional and organized (sort of like flexing your muscles before a wrestling match). However, they certainly didn’t teach anybody how to actually put those designs into use in an organized workflow. Word-processing programs were the devil. As a result of their design program zealotry I have a lot of resumes, cover letters and general business letters that are Pagemaker, InDesign, QuarkXpress and Illustrator files. This isn’t what these programs were built to do.

These programs were built for carefully typesetting layouts

This problem makes the process of writing a letter too complex. I know what you’re saying. You think I’m lazy. You’re wrong. I have great powers of determination and focus, but usually I get distracted by details. Suddenly I’m typesetting a bill and not just writing up a bill. Before I know it I’ve shot the afternoon twiddling with letter-spacing on a 6 hour project billing.

The solution to this ease of distraction is to use the right program for the task at hand. A word-processor is a powerful tool and can save you a lot of time without compromising your concern for appearances. How do they save me time?

  1. Page Templates
  2. Style Sheets

“But my layout program has that and MORE!”, you say. Well, that’s my point. You don’t need more to write letters.

WYSIWYM

One of the cool ideas I came across in my Linux/Open-source self-education is the acronym ‘WYSIWYM’. We’re all familiar with WYSIWYG (What You See Is What You Get) and that applies to all of our layout and common word processing programs. WYSIWYM stands for ‘What You See Is What You Mean’. A subtle but important difference.

The program that is most popularly associated with this concept is called TeX (pronounced ‘tek’). If you’re interested in the history, check out Wikipedia. My introduction to TeX was actually through another program called LaTeX which simplifies the creation of TeX markup. In LaTeX you simply see the text with no formatting. All you see is a definition of document structure to the left of your content (this line is a Headline 1 format, that line is a blockquote). No nitpicking about what font and linespacing. Unfortunately, this program had a big learning curve and I don’t recommend it for most people. Plus, when it came to printing and generating PDFs I ran into a lot of missing elements that needed to be installed separately. Not easy to setup.

Okay, so, what’s that have to do with using a word-processor? Well, you can use a w-p in the same way via style sheets. Here’s what you do:

  1. Take an afternoon to design your letterhead in your layout program of choice.
  2. Figure out what the margins on your letter have to be to fit your letterhead format.
  3. Save a pdf of your letterhead design as though you were printing blank letterhead.
  4. Open a new document in OpenOffice (or MSWord if you must…) and set the margins accordingly.
  5. Now type out some example copy or use an existing letter to work out your stylesheet.
  6. Design all the styled elements that you foresee using in your letters. Take your time. Get the after-paragraph-spacing and typefaces all figured out so that it looks beautiful. Make sure that you are using the ‘Styles and Formatting’ palette or window and modifying those elements with your changes.
  7. Delete your test content and save this document as a TEMPLATE somewhere handy.
  8. Every time you want to right a letter just open a new document from this template and write your letter with a WYSIWYM state of mind using your preset styles

Now your letterhead is one file and all of your little letters, bills and requests can be saved in simple word-processor files. If you’re especially concerned about future-proofing your letters, check out OpenOffice and the Open Document Formats. From Wikipedia:

OpenDocument benefits from separation of concerns by separating the content, styles, metadata and application settings into four separate XML files.

So, worst case scenario: after the demise of OpenOffice twenty years from now you are left with an ISO-standard document format that will most likely be supported by any respectable word-processing program that exists at the time.

Actually, even worse: ODF isn’t supported at all so you are left with the option of opening the XML file containing only the basic text content of your letter which you will have to reformat.

Either way what’s the chance of your InDesign CS3 binary format file being accessible that far in the future? Good luck trying to pull the plain text content of your letter out of a binary file!

Merging the Letter with the Letterhead

On Linux there is a great command line program called ‘PDFTK’ or the PDF Took Kit. It does some cool things but my only use for it right now is to merge our Letterhead.pdf with our LetterToBob.pdf. It’s simple as pie, but I want to look into creating a simple GUI for it. A little dialog window can’t be that difficult to program, can it? 😀

First install PDFTK via Apt-Get or Synaptic if you are on a Debian-based Linux distribution. Otherwise, get on Google and look into getting it. Sorry for the lack of support at this stage.

Once you have it installed, open a terminal window. For this example I am going to save my two PDFs to my desktop and then use PDFTK to merge them from there.

Go back to the Terminal, change to your Desktop directory (cd ~/Desktop if you don’t know) and type the following:

pdftk LetterToBob.pdf background Letterhead.pdf output LetterOnLetterhead.pdf

Break It Down!:

  1. First tell the terminal which program to use
  2. Specify your original PDF document by filename
  3. ‘background’ specifies the function of PDFTK to use
  4. Specify the background PDF document by filename
  5. ‘output’ tells the program what to name the product of the indicated action
  6. Specify the filename for the product of the PDFTK background action

Click enter and you will have a new PDF named ‘LetterOnLetterhead.pdf’ on your desktop shortly.

I don’t know, but I can only hope that Adobe Acrobat Professional can also merge PDFs in this way.

Now you have a professional letter on your own custom letterhead in PDF format for emailing or printing. The ODF files are simple to keep organized and your letter head is easy to keep track of on one layout file. This could be accomplished with layout tools as well, but this is how I do it and thought other people might benefit from hearing about it.

Adobe CS3: A Real Dud

As you can guess, I’m not all that impressed with CS3.

Photoshop made some great improvements to the Layers Palette

  1. You can finally temporarily select multiple layers with the ease of shift or command+click
  2. Creating a New Group with several selected layers is Command+G
  3. The Move tool can be sensitive to groups if you wish it so. Nice to be able to shift things around without constantly referring to the Layers Palette

I don’t use InDesign or Illustrator enough to say, but the most obvious feature across the CS3 club is that they are even bigger apps than before and they take even longer to startup than before. Oh, and they’re sluggish too. Why is editing slices such a laborious task? CS handled easily.

Then tonight I was setting up my Creative Director’s new 17″ MacBook Pro (I’m a Linux guy and all, but this is still sweet) and discovered that these apps performed much better on the new MacIntel. So maybe it’s more about being on an old Dual Proc 2GHz PowerPC with 2GB of RAM DINOSAUR that’s causing most of my disgust.

Dear Microsoft, Do You Like Being Hated?

From Microsoft’s Improving E-mail Deliverability into Windows Live Hotmail pdf:

Q: If my message displays properly in Hotmail, will it look the same in Outlook?

A: No, we recommend that messages be tested with both Outlook 2003 and 2007 as well as Hotmail as messages may not be rendered the same way in all e-mail clients and services. Outlook 2007 no longer support style sheets the same way previous versions of Outlook did. This means that even if HTML content looks fine in Internet Explorer and Outlook 2003, it may not in Outlook 2007.

I think they are referring to their blunder of switching to the Word rendering engine for Outlook 2007’s HTML emails. –Jason

Here are a few recommendations for improving Outlook rendering (p16):

  1. Do not use background images. Background images, whether specified in the <body>, <table>, or <td> tag, cannot be used because of inconsistencies among e-mail clients, most notably Outlook 2007.
  2. Do not use CSS (cascading style sheets), inline styles or JavaScript. Cascading style sheets, where the styles are defined within the Web page itself, are only fully supported in most e-mail clients. Attached style sheets are not supported at all. Additionally, Web e-mail clients such as AOL Webmail and Gmail change or comment out style tags, resulting in unpredictable formatting. As a result, we recommend that you use only basic HTML tags. (For instance, to underline text, use the <u> tag, for bold use the <b> tag.)
  3. Inline style attributes are your only option. Use only the most basic style attributes to designate font size, color, and type, and use them within basic HTML tags (do not use <div> or <span> tags). Do not use styles to set table or row heights or any spacing. Do not define your style elements within the <head> tag of the document (Hotmail will entirely strip this out). JavaScript is not supported in any e-mail client. Do not include any JavaScript, including onClick=”return(false);” in your HTML. Jason says:Nothing new, but why?!…
  4. Set table width to 600 pixels max. The convention for HTML e-mail is to limit a set table width to 600 pixels. Though a wider table may render fine in Outlook or on a high resolution monitor, users with older systems or who choose an 800 X 600 display setting will not be able see the entire width of the e-mail.
  5. Do not use the <body> tag to set any essential attributes. Some Web e-mail clients (notably Yahoo and Hotmail) strip out the BODY tag within e-mails completely. You should not include any attributes in the BODY tag. To set values such as background color, use the BGCOLOR attribute inside the TABLE or TD tags. Jason says:Nothing new…
  6. Use HTML character names. Many e-mail clients won’t display raw 8-bit characters correctly (they’ll show up as question marks or squares instead). As a result, you must use HTML codes for these characters. Use only the HTML names, not the numeric values. Jason says:Nothing new…

In other news, not much has changed. I have no understanding for the email client industry’s bias against CSS. It makes no sense and we are all now dumber for having realised this is their current stand on the issue.

Good News: Yahoo Mail supports CSS quite well.